Friday, 26 April 2013

Baileys and Chocolate Cheesecake


I made my first ever cheesecake!  I can't say this was the cheapest thing to make. I didn't have any Baileys so that cost $30.00. And everything else like the butter, cream cheese, thickened cream, biscuits and chocolate came to $40.00. So $70.00 just for one cheesecake...And a lot of Baileys drinks later! I may look into some other baileys baking recipes later. Not sure how much of the bottle is left though...

This recipe was not perfect. I would suggest putting more butter with the biscuits, try 20grams at a time, as with just 100grams the biscuit was still really loose. As I don't really know what it is like making cheesecake, I had a suspicion this wasn't right, but I decided to stick to the recipe.  If I had put more butter I think the biscuits will have flattened into the bottom of the tin better, as currently it is half biscuit half cheesecake! Also, digestive biscuits are yuck! I might use wine biscuits next time, or I suppose you could try malt biscuits (which I also think are yuck :P ) It also needs more Baileys. There was a really weak taste. So I would suggest adding more to your taste, and you'll want to put a bit more icing sugar or cream cheese just to keep it thick. I didn't bother putting anything on top of the cheesecake, I was really wanting to eat it asap... I found the recipe here.

Baileys and Chocolate Cheesecake
  • 100g butter
  • 250g digestive biscuits, crushed
  • 600g Philadelphia cream cheese
  • 25ml Baileys
  • 100g icing sugar
  • 300ml double cream, whipped
  • 100g chocolate, grated
  • 200ml double cream, whipped (to garnish)
  • Cocoa powder (to garnish)
  1. Melt the butter in the pan, then add the crushed digestive biscuits. Mix well until the biscuits have absorbed all the butter.
  2. Remove from the heat and press into the bottom of a lined 18cm springform tin. Place in the fridge and allow to set for one hour.
  3. Meanwhile, prepare the filling. Lightly whip the cream cheese then beat in the Baileys and icing sugar. Fold in the whipped cream and grated chocolate. When smooth, spoon evenly onto biscuits.
  4. Refrigerate and allow to set for a further two hours. Once set, remove and decorate with whipped cream and cocoa powder dusted over the top. Serve.

Thursday, 25 April 2013

Baby shower cupcakes


Last Friday at work they threw a baby shower for my colleague, who as you might have guessed, is having a baby girl! Of course that meant the cupcakes had to be pink! I totally forgot I was going to make cupcakes until the night before! So without a lot of time after work, I decided to just simply do a pink strawberry icing with a chocolate cupcake. If I had more time I would have been a bit more creative!
I got smaller pink cupcake cases, which totally lost their colour while baking. Oh well, it made the icing more of a focus! I used this chocolate cupcake recipe in my last post, and this time it still made 24 cupcakes, but they were a smaller size than normal cupcakes. Both the cupcake recipe, and the buttercream recipe come from the book Divine Cupcakes by Tamara Jane. I halved the icing, which didn't quite cover all 24 cupcakes, and I added natural strawberry essence for the flavour.
 
Chocolate Cupcakes:
  • 430g plain flour
  • 2 teaspoons baking soda
  • 1 teaspoon baking powder
  • 1 teaspoon salt
  • 250ml hot water
  • 100g cocoa
  • 250ml cold water
  • 200g unsalted butter, softened
  • 560g caster sugar
  • 4 eggs
  • 4 teaspoons vanilla essence
  • Makes 36
  1. Preheat the oven to 170°C. Line three 12-hole muffin trays with cupcake papers.
  2. Sift together the flour, baking soda, baking powder, and salt. In a separate bowl whisk together the hot water and cocoa until you have a smooth paste. Add the cold water and whisk until evenly combined.
  3. In a separate bowl, cream the butter for 1-2 minutes. Add the caster sugar and two of the eggs. Beat until light. Add the last two eggs one at a time, beating until well combined, then stir in the vanilla essence. Add half of the flour to the creamed mixture and beat on low speed until combined. Add half of the cocoa mixture and beat until combined. Repeat this process but do not over-beat as this will toughen the mixture.
  4. Divide the mixture between the cupcake papers. They should be about half-full as this mixture rises substantially. Bake for 25 minutes or until springy when pressed in the centre.
  5. Cool cupcakes in the muffin trays for 5 minutes before removing the cupcakes to a wire rack to cool completely.
Vanilla Buttercream Frosting
  • 200g unsalted butter, softened
  • 125ml milk
  • 1 tablespoon vanilla essence
  • 2kg icing sugar, sifted
  1. Cream the butter for 1-2 minutes. Add the milk, vanilla, and half of the icing sugar. Beat for atleast 3 minutes, or until the mixture is light and fluffy. Add the remaining icing sugar, and beat for another three minutes, or until the mixture is of a spreadable consistency.
  2. Add in your food colouring until it is the colour you want, and the essence until you get the flavour you want.


Sunday, 14 April 2013

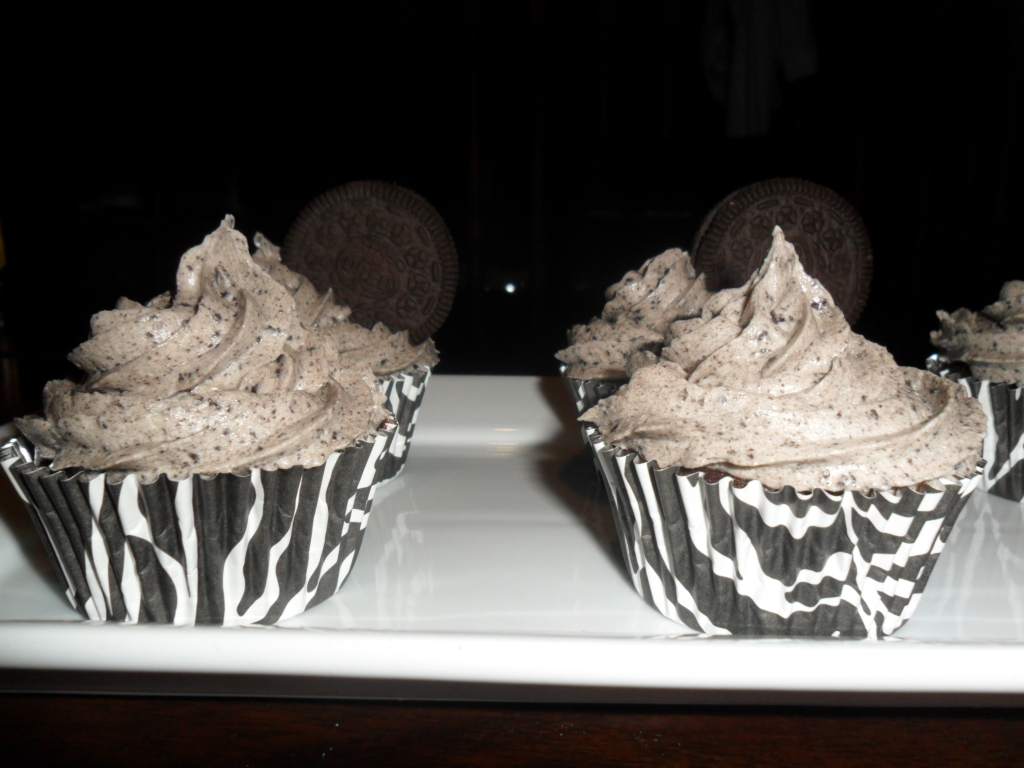
Oreo Cupcakes


I made these cupcakes for the first time about a year ago, before I had started my blog, so I didn't have any pictures of them. But these are super yummy, and after requests, I decided to make them again! The chocolate cupcake recipe I used is from the book Divine Cupcakes by Tamara Jane, who is the co-owner of the Tempt cupcake store in town! The recipe is for 36 cupcakes, but I halved it. Due to the Oreo in the bottom of the case, this made 24 cupcakes. So far this is the best chocolate cupcake recipe I have used! The icing recipe is from this website. That website does tell you how to make the cupcakes overall, but calls for a premade cake mix...I absolutely hate premade cake mixes! Making them from scratch gives a much better flavour. I will put the full recipe down that makes 36, but it is super simple to half to make 24 of these Oreo ones! The recipe says the cupcakes will rise quite a bit, but I didn't find that they did. Also, step 4 is not part of the original recipe, just for these Oreo ones. The Oreo cupcake recipe says to add crushed Oreos to the cupcakes, but I don't do this. I used only large Oreos as I couldn't be bothered buying the mini ones :P

Chocolate Cupcakes:
  • 430g plain flour
  • 2 teaspoons baking soda
  • 1 teaspoon baking powder
  • 1 teaspoon salt
  • 250ml hot water
  • 100g cocoa
  • 250ml cold water
  • 200g unsalted butter, softened
  • 560g caster sugar
  • 4 eggs
  • 4 teaspoons vanilla essence
  • Makes 36
  1. Preheat the oven to 170°C. Line three 12-hole muffin trays with cupcake papers.
  2. Sift together the flour, baking soda, baking powder, and salt. In a separate bowl whisk together the hot water and cocoa until you have a smooth paste. Add the cold water and whisk until evenly combined.
  3. In a separate bowl, cream the butter for 1-2 minutes. Add the caster sugar and two of the eggs. Beat until light. Add the last two eggs one at a time, beating until well combined, then stir in the vanilla essence. Add half of the flour to the creamed mixture and beat on low speed until combined. Add half of the cocoa mixture and beat until combined. Repeat this process but do not over-beat as this will toughen the mixture.
  4. Place one Oreo in the bottom of every cupcake paper.
  5. Divide the mixture between the cupcake papers. They should be about half-full as this mixture rises substantially. Bake for 25 minutes or until springy when pressed in the centre.
  6. Cool cupcakes in the muffin trays for 5 minutes before removing the cupcakes to a wire rack to cool completely.
Oreo Icing/Cookies and Cream icing
  • 2 boxes Oreos
  • 225g cream cheese, room temperature
  • 1/2 cup butter, room temperature
  • 3 3/4 cups icing sugar
  • 1 teaspoon vanilla extract
  • Mini Oreos
  1. Cream together the cream cheese and butter. Add vanilla, then slowly beat in the icing sugar.
  2. Crush up the Oreos until fine, then beat these into the mixture. Add more of less Oreos to your taste.
  3. When cupcakes are cool, frost them, and decorate with a mini Oreo.


Sunday, 31 March 2013

Easter Cupcakes


Holidays themed baking is becoming a must for me. I'm trying to not bake at the moment as I am currently "dieting" (or should I say, WAS!), but holidays only come once a year. Do I really want to wait another whole year to make my current holiday inspiration? Not really. Because then I'll be passing up the opportunity for next years idea!
I wanted to make my cupcakes very...can I say elegant? Atleast that's what I aimed for... Easter is a time for chocolate, and while I could have done chocolate flavoured cupcakes, I didn't feel like it. I came up with chocolate bunnies! You would not believe the trouble I went through to get these. I was originally going to buy a chocolate mould off the internet, but the next day I was told that they were selling chocolate moulds at the Warehouse in Porirua. I checked the Johnsonville Warehouse just incase, and they weren't there. On Thursday, on our way up to Levin for the weekend I dropped into the Warehouse in Porirua. But I couldn't find them there, and people were hectically buying Easter Eggs so I had to floor it out of there. I went to Palmerston North on Saturday, searched around the Plaza but couldn't find any kitchen stores. As we were leaving I stopped at the Warehouse Extra...Couldn't find no moulds...But as I was about to leave and give up all hope, I found Rabbit Muffin Moulds! I don't know who would make Rabbit shaped muffins...But it worked perfectly for me! Anyway, enough from me. Onto the cupcake bizzo... The frosting recipe comes from the book "Christmas Cupcakes" by Annie Rigg. Use whatever flavour cupcake you wish.

Marshmallow Frosting
  • 250g Caster Sugar
  • 1 tablespoon water
  • 4 egg whites
  • a pinch of salt
  1. Put all the ingredients in a heatproof bowl set over a pan of simmering water.
  2. Whisk slowly until the sugar has dissolved and the mixture is foamy. Continue cooking until the mixture reaches atleast 60°C (140°F) on a sugar thermometer.
  3. Immediately pour the frosting into the bowl of a freestanding mixer fitted with the whisk attachment (or use an electric whisk and mixing bowl) and beat on medium speed until it stands in stiff glossy peaks - this will take about 3 minutes.
For the chocolate bunnies you can basically use whatever mould you like, and whatever type of chocolate you like! I have used Whittakers Creamy Milk, and White chocolate. Simply place the chocolate in a heat proof bowl over a pot of boiling water. Stir constantly until the chocolate has melted and is a smooth texture. Pour into your mould, and place this in the fridge. When they have set, remove them. You may want to place them in the freezer for awhile to set them properly.

The Marshmallow Frosting tastes best once it has set, so serve them the day after.


Saturday, 23 March 2013

Christmas Cupcakes

 
So I made these cupcakes at Christmas time, but I never got around to posting them! As you can see, my green is very light, and my red is more like pink. I only had supermarket bought basic food colouring colours, and also didn't want to put too much in. Too much food colouring is definitely not good for you!


I used a plain butter cream for the icing, and my vanilla cupcake recipe (see here)

To do this icing, I split the mix into two bowls. Then I added green food colouring, and red to the other, until I was happy with the colour. You need 3 piping bags, and one nozzle. Take one bag, and fill it with one lot of icing. Take another piping bag, and fill it with the other icing. Flatten them out a little, so that the icing reaches the opening. Take the two bags, and slip them into the third. You need the ends to be even, or it will only pipe out one colour. Put on the nozzle, and test.


Sunday, 4 November 2012

Halloween Cupcakes


It's not Halloween anymore, but I was waiting on what I need to do this to arrive in the post. Better late than never! I got lazy and only made four bats. Also, depending on how much icing you like to put on your cupcakes, you might want to make a litte extra. Enjoy :)

Gooey chocolate vanilla cupcakes with buttercream icing

Chocolate Bats:
  • Mini Bat shaped cookie cutter (or anything else halloween shaped)
  • Chocolate Melts
  1. Fill a pot halfway with hot water, and put on the stove to boil. When boiling, remove from heat and place a metal bowl over.
  2. Fill this bowl with the chocolate melts, and stir while the chocolate melts.
  3. Line a plate with baking paper, and place your cookie cutter on this. Spoon your melted chocolate in this.
  4. Stick in the freezer till in hardens.
  5. Push the chocolate out of the cookie cutter. Unfortunately, you'll probably have to do this one at a time.
Gooey Chocolate Vanilla Cupcakes:

  • 125g unsalted butter, softened
  • 1/2 cup & 2 tbsp caster sugar
  • 1/2 tsp pure vanilla extract
  • 2 large eggs, room temperature
  • 1 cup flour
  • 1 tsp baking powder
  • 3 tbsp milk, warmed for 10 seconds in the microwave
  •  Block of chocolate
    1. Preheat oven to 180°C. Line a 12 hole muffin pan with cupcake cases.
    2. Cream the butter and sugar, then beat in the vanilla extract. Beat in the eggs one at a time. Sift in the flour and baking powder and beat. Pour in the warm milk and beat well.
    3. Fill cupcake holders up to half way with the mixture, then place in two pieces of chocolate. Fill the rest of the holder.
    4. Bake for 20 minutes.
    Buttercream Icing:
    • 150g unsalted butter
    • 2 cups icing sugar
    • 2-3 tbsp hot water
    • 1 tsp vanilla essence
    • Red and yellow food colouring
    1. Beat the butter until smooth and pale. Add the icing sugar half a cup at a time. Add hot water until icing is at your desired consistancy. Beat in essence. Add red and yellow food colouring until you get the orange you want.

    Wednesday, 10 October 2012

    Chocolate Mousse Slice


    I had an urge to make something Mousse related, and since Mousse itself would be not too exciting, what better than a slice?! I used milk chocolate instead of dark chocolate, Dairy Milk to be exact. This is not something you'd want to eat alot of! I got the real of approval from my partner, so it mustn't be too shabby huh! I got this recipe off Taste.com.au, and some people were saying they had problems with it not setting right, and the mousse ingredients separating. It set fine for me, and didn't separate. It was pointed out that the ingredients will separate if you don't allow them to cool properly.

    Base:
    • 1 1/2 cups self rising flour
    • 1/2 cup brown sugar
    • 200g butter, melted
    • 1/4 cup cocoa powder, sifted
    Mousse:
    • 300g dark chocolate, chopped
    • 2 eggs, seperated
    • 3/4 cup thickened cream, whipped
    • shaved chocolate and cream to serve
    1. Preheat oven to 180°C/160°C(fan forced). Line the base of an 18x28cm slice pan with baking paper, allowing an overhang on all sides.
    2. Combine flour, sugar, butter and cocoa powder in a bowl. Press over the base of prepared pan. Bake for 20 to 25 minutes, or until firm to touch. Cool completely.
    3. Place chocolate in a metal bowl over a pot of boiling water, and melt it. Cool.
    4. Add egg yolks to chocolate. Stir until just combined. Fold in cream. Beat egg whites until soft peaks form. Fold into the chocolate mixture. Spoon over the base, and use a spatula to level the top. Refrigerate for 6 hours. Cut into squares and serve.
    Cut off the end for a better image of the layers. And for a taste test :)